בניית ה-Lumo שלך
שכפול ומחיקת פרויקטים
ניהול יעיל של ה-Lumos שלכם אומר שיש לכם את הגמישות להעתיק קיימים או להסיר כאלה שאינכם צריכים עוד. LumoPages הופכת שכפול ומחיקת פרויקטים לפשוטים, ומבטיחה שתוכלו לשמור על סביבת עבודה מאורגנת ויעילה.
מדריך זה ילווה אתכם כיצד לשכפל Lumo קיים כדי לחסוך זמן ביצירות חדשות, וכיצד למחוק בבטחה פרויקטים שאינכם צריכים עוד.
למה לשכפל פרויקט?
שכפול פרויקט הוא חוסך זמן מדהים ממספר סיבות:
- שימוש חוזר בעיצובים מוצלחים: אם יש לכם Lumo עם עיצוב מצוין, מבנה שלבים או סט שדות שאתם רוצים להשתמש בו כנקודת התחלה לטופס חדש, שכפול מושלם.
- יצירת וריאציות: צרו בקלות גרסאות שונות של Lumo לבדיקות A/B, קמפיינים שונים או אירועים ספציפיים (למשל טופס "Customer Feedback" וטופס "Event Feedback" שדומים במידה רבה).
- תבנית לשימוש עתידי: אם לא שמרתם עיצוב כתבנית אישית, שכפול פרויקט שמגלם מראה או מבנה ספציפי יכול לשרת מטרה דומה.
שלב אחר שלב: שכפול פרויקט
- נווטו לדף "Projects": מלוח הבקרה של LumoPages, לחצו על "Projects" בתפריט הניווט הראשי. דף זה מציג את כל ה-Lumos הקיימים שלכם.
- אתרו את הפרויקט לשכפול: מצאו את פרויקט ה-Lumo הספציפי שאתם רוצים להעתיק ברשימה.
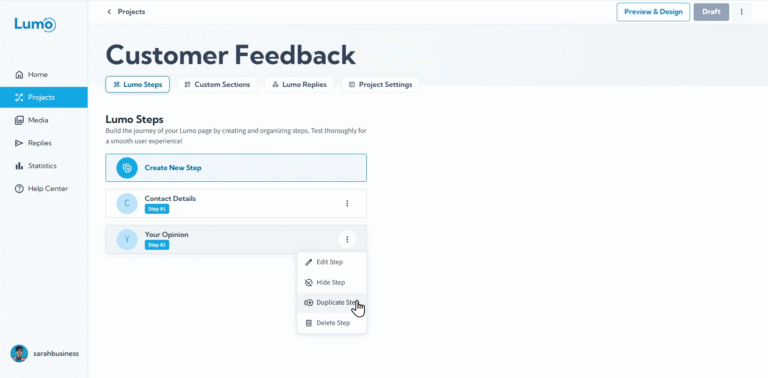
- גשו לאפשרות השכפול: רחפו מעל הפרויקט או חפשו תפריט (לעיתים קרובות מיוצג על ידי אייקון שלוש נקודות
...או אייקון גלגל שיניים) הקשור לפרויקט. בתפריט זה תמצאו את אפשרות "Duplicate" או "Copy".
אשרו שכפול (ושינוי שם): לחצו על "Duplicate".
- LumoPages ייצור עותק מדויק של הפרויקט, כולל כל השלבים, הבלוקים וההגדרות.
- בדרך כלל יוסיף "Copy" או דומה לשם הפרויקט החדש (למשל "Customer Feedback on Patisserie Visit - Copy").
- סביר שתופנו לעורך הפרויקט המשוכפל החדש או שתתבקשו לשנות את שמו מיד.
למה למחוק פרויקט?
מחיקת פרויקטים עוזרת לכם לשמור על חשבון LumoPages מאורגן וללא עומס. אתם עשויים למחוק פרויקט אם:
- זה היה פרויקט בדיקה שכבר לא נחוץ.
- הוא מיושן או כבר לא רלוונטי.
- יצרתם גרסה טובה יותר ורוצים להסיר את הישנה.
שלב אחר שלב: מחיקת פרויקט
- נווטו לדף "Projects": מלוח הבקרה של LumoPages, לחצו על "Projects" בתפריט הניווט הראשי.
- אתרו את הפרויקט למחיקה: מצאו את פרויקט ה-Lumo הספציפי שאתם רוצים להסיר מהרשימה.
- גשו לאפשרות המחיקה: רחפו מעל הפרויקט או חפשו תפריט (למשל
...או אייקון גלגל שיניים) הקשור לפרויקט. בתפריט זה תמצאו את אפשרות "Delete" או "Trash".
אשרו מחיקה: לחצו על "Delete".
- תקבלו הודעת אישור כי פעולה זו בלתי הפיכה. הודעה זו בדרך כלל מבקשת מכם לאשר על ידי הקלדת שם הפרויקט או לחיצה על כפתור אישור ברור.
מחיקת פרויקט היא פעולה קבועה ובלתי הפיכה. כל השלבים, הבלוקים, התגובות שנאספו והנתונים הקשורים יוסרו מחשבון LumoPages שלכם. ודאו שייצאתם כל נתון נחוץ (כ-CSV או PDF) לפני מחיקת פרויקט.
על ידי שכפול ומחיקה יעילים של פרויקטים, תוכלו לשמור על סביבת עבודה מאורגנת ויעילה בתוך LumoPages, ולהבטיח שרשימת הפרויקטים שלכם תמיד רלוונטית וקלה לניהול.