אינטגרציות ואפשרויות מתקדמות
הגדרת Webhooks לתגובות חדשות
למשתמשים שרוצים לאוטמט תהליכי עבודה או לשלב את LumoPages עם מערכות חיצוניות כמו CRM, כלי אוטומציה שיווקית או מסדי נתונים מותאמים אישית, Webhooks הם תכונה עוצמתית במיוחד. Webhook מאפשר ל-LumoPages לשלוח אוטומטית נתונים מהגשות טפסים חדשות לכתובת URL שתציינו, בזמן אמת. כלומר, הנתונים שלכם יכולים להפעיל מיידית פעולות או להישמר במערכת המועדפת עליכם.
מדריך זה ילווה אתכם בתהליך שלב אחר שלב של הגדרת webhook ב-Lumo שלכם.
מהו Webhook?
Webhook הוא למעשה הודעה אוטומטית שנשלחת מאפליקציה אחת לאחרת כאשר מתרחש אירוע ספציפי. ב-LumoPages, האירוע הוא הגשת טופס חדשה. כאשר Lumo מקבל תגובה חדשה, הוא יכול "להתחבר" לכתובת ה-URL שציינתם (הנקראת "endpoint") ולשלוח את נתוני ההגשה באופן מיידי.
למה להשתמש ב-Webhooks?
- אוטומציה בזמן אמת: הפעילו פעולות במערכות אחרות מיד לאחר שליחת טופס (למשל, הוספת ליד חדש ל-CRM, שליחת אימייל ברכה).
- אינטגרציה חלקה: חברו את LumoPages עם כמעט כל מערכת שתומכת ב-webhooks, כולל אפליקציות מותאמות אישית או פלטפורמות אוטומציה פופולריות כמו Zapier או Make.com.
- מעבר להתראות אימייל: קבלו את הנתונים הגולמיים והמובנים של ההגשות שלכם ישירות למערכות העיבוד, ולא רק אימייל התראה.
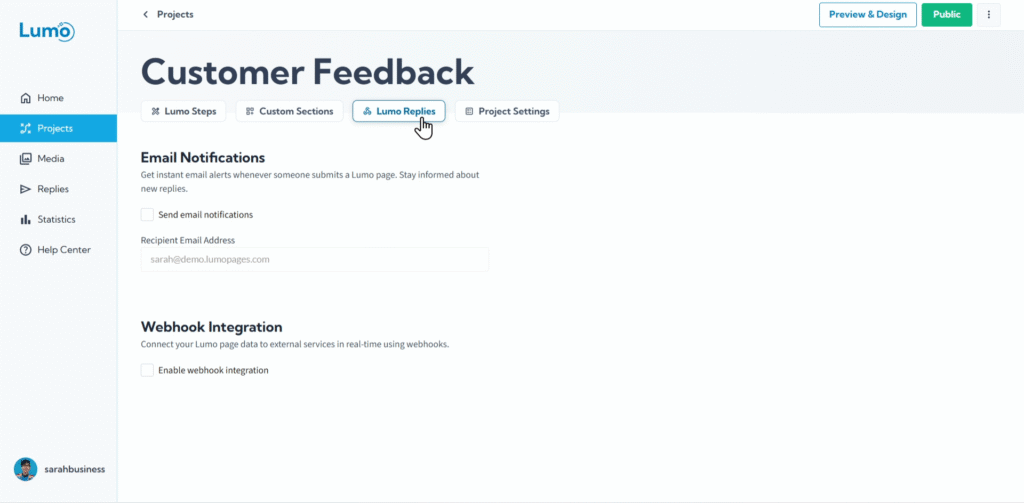
שלב אחר שלב: הגדרת ה-Webhook שלכם
הפעילו התראות אימייל. תמצאו תיבת סימון להפעלת התראות אימייל על תגובות חדשות.
- סמנו את התיבה כדי להפעיל.
הזינו את כתובת ה-Webhook (Endpoint). זהו המידע החשוב ביותר. כתובת ה-Webhook (הידועה גם כ-"endpoint URL") היא כתובת האינטרנט הייחודית של המערכת שתקבל את הנתונים מ-LumoPages.
- בדרך כלל תקבלו כתובת URL זו מהשירות החיצוני שאליו אתם משתלבים (למשל, תיעוד ה-API של ה-CRM שלכם, או שלב "catch webhook" בכלי אוטומציה כמו Zapier או Make.com).
- הדביקו את כתובת ה-Webhook שהעתקתם בשדה הקלט המיועד.
הוסיפו כותרות אבטחה (אופציונלי אך מומלץ). לאבטחה משופרת, תוכלו להוסיף כותרות HTTP מותאמות אישית. אלה בדרך כלל כוללות מפתחות API או אסימוני הרשאה שהמערכת המקבלת משתמשת בהם כדי לאמת שהנתונים הנכנסים לגיטימיים.
- חפשו אפשרות ל-"Webhook Headers".
- הזינו מחרוזת JSON שכוללת זוגות של "Key" (למשל, Authorization, X-API-Key) וה-"Value" המתאים (אסימון ה-API או מפתח הסוד שלכם).
לחצו על "Apply Changes".
נתונים שנשלחים דרך webhooks מועברים ב-HTTPS, אך הנתונים עצמם אינם מוצפנים על ידי LumoPages לאחר ההעברה. באחריותכם להשתמש במפתחות מאובטחים וייחודיים לאימות (דרך כותרות) ולהבטיח שהמערכת המקבלת מטפלת בנתונים בצורה מאובטחת, ובכל מקרה שימו לב לעולם לא לבקש מידע רגיש (קראו עוד כאן). לעולם אל תחשפו פרטי אימות רגישים ישירות ב-URL.